Odds are, you get more emails in a single day that you can handle – advertisements, work messages, social media notifications, receipts, and more.
The average person gets more than 100 emails per day, which is enough to drive anyone crazy – especially if they don’t have a system for keeping all those messages organized.
Gmail allows users to create custom folders so they can keep their accounts tidy and manageable.
This guide will teach you how to create folders in Gmail and keep your account so organized that even Marie Kondo would approve!
Table of Contents
How to Create a Folder in Gmail in Just 3 Clicks
Gmail refers to folders as “Labels”. Each time you create a new label, you’re creating a new folder – a new option for email storage. Google uses the term in a lot of different places, including Drive and Contacts. When you create email groups or add new contacts, labels will play a big role, too.
Below, you’ll find instructions for creating new labels for your Gmail account in both the desktop and mobile versions.
Creating Folders in Gmail (Desktop)
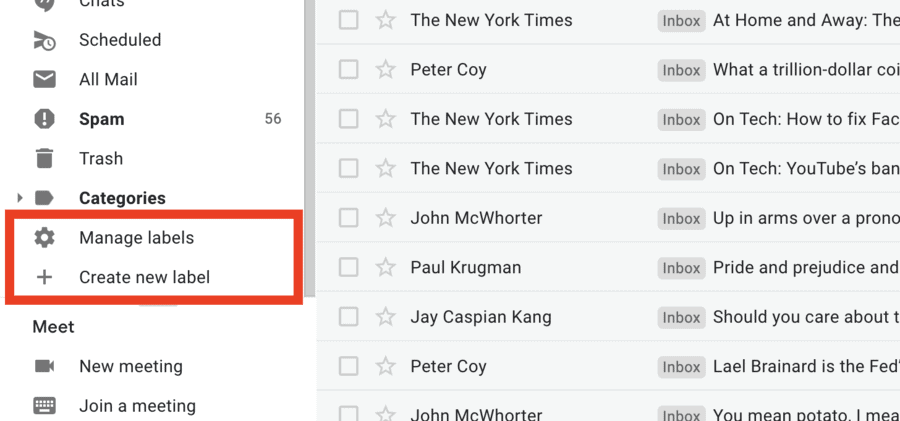
1. Scroll to the bottom of the Gmail side menu and click “Create New Label“:
2. Choose a name for your new Gmail folder.
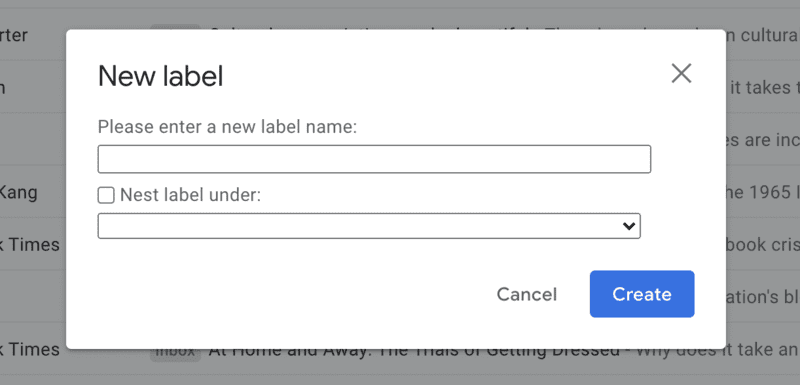
You can choose the name of the label arbitrarily if you like, but it’s wise to pick a name that you can remember easily and is descriptive of a large group of emails.
You can learn more about recommended Gmail organization practices in this section below.
Your new folder (or label) will show up in the Gmail side menu, right beneath “Invoices/Receipts”:
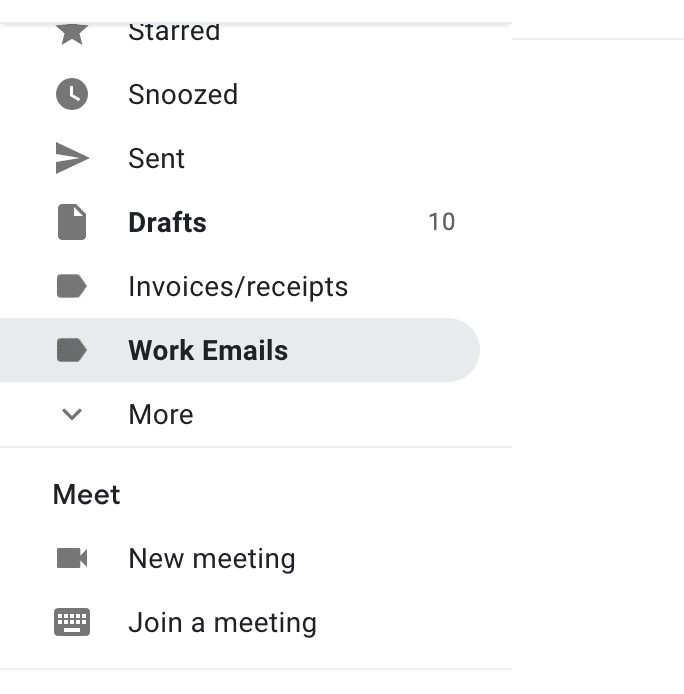
You can also re-arrange labels in Gmail so that your most important folders are the easiest to access. Once you’re done creating and filling your new folders, you can head to this section to learn how to organize them.
Nested Labels
When creating a new label, you’ll also see the option to create a “Nested Label” – a folder inside a folder.
Nested labels are helpful when you’ve got a category of emails that is itself getting too big to manage effectively. For example, you may create a folder for work emails and then realize you need 3-4 sub-folders to stay on top of emails from coworkers, managers, and customers.
(This option is only available on the desktop version of Gmail)
Creating Folders in Gmail (Mobile)
Making a new folder in the Gmail app (both Android and iOS) is pretty easy, too.
Here are the steps for creating folders in Gmail from your phone:
1. Tap the Menu icon (three lines) in the upper left-hand corner.
2. Scroll down to the section of the menu titled “Labels“. Press “Create New“.
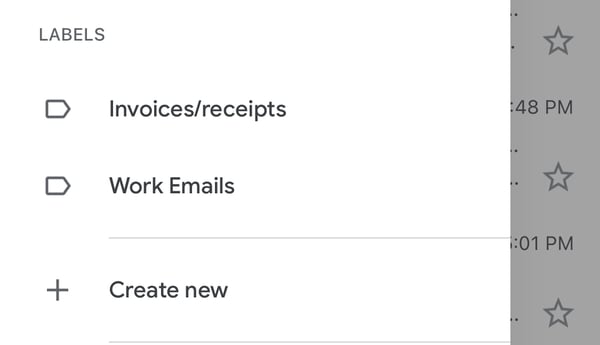
4. Give your new label a name.
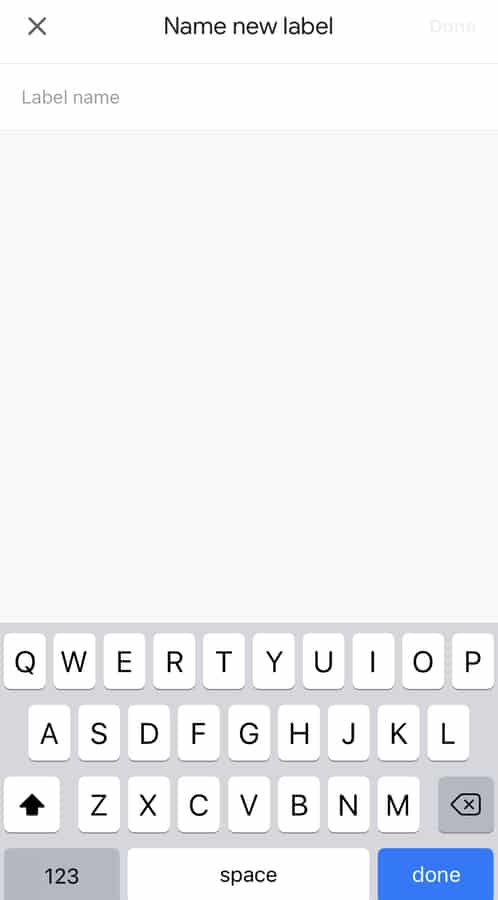
Note that you won’t be able to create nested labels on a mobile device; this can only be accomplished with the desktop version of Gmail.
How to Move Emails to a New Folder in Gmail
Okay, now that you’ve created new folders for your Gmail account, it’s time to fill them up.
You can do that in as little as four clicks by following these instructions:
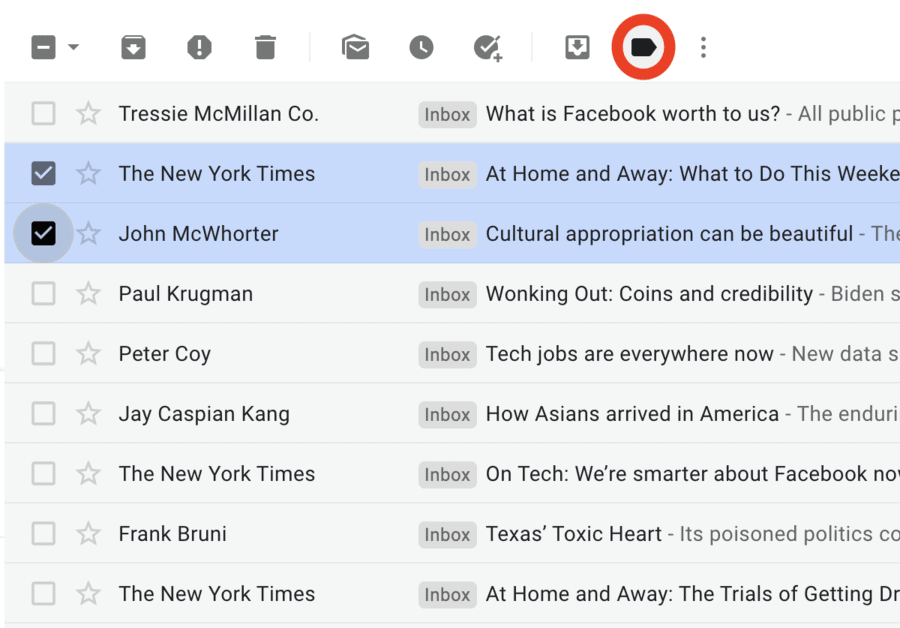
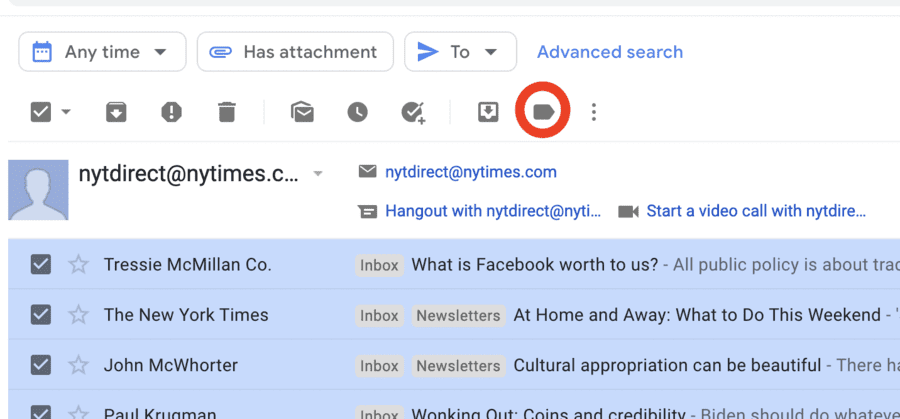
1. Highlight the emails you want to move by clicking the checkbox next to the subject line. Then, click the “Labels” icon located in the top menu:
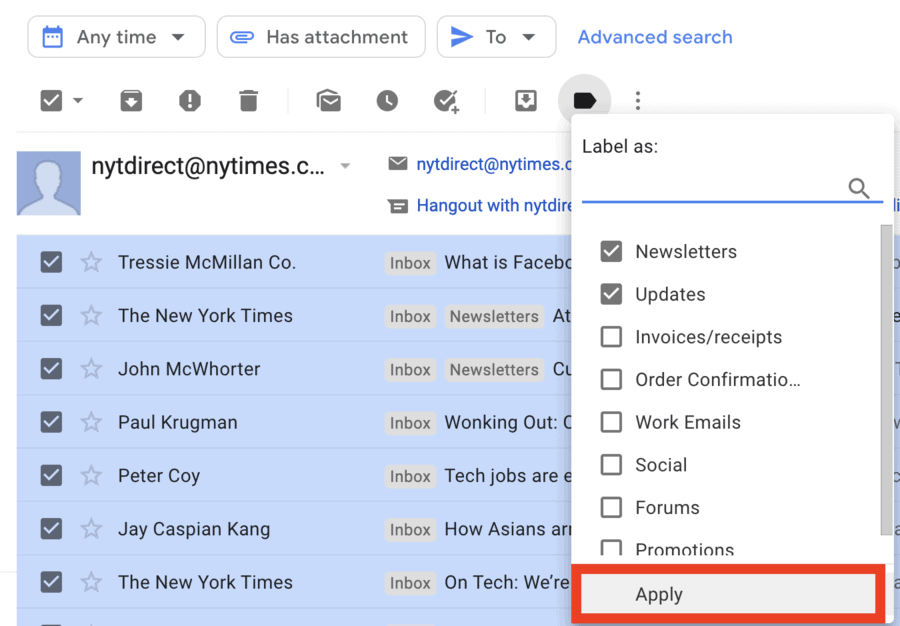
2. Select the appropriate label and click “Apply”.
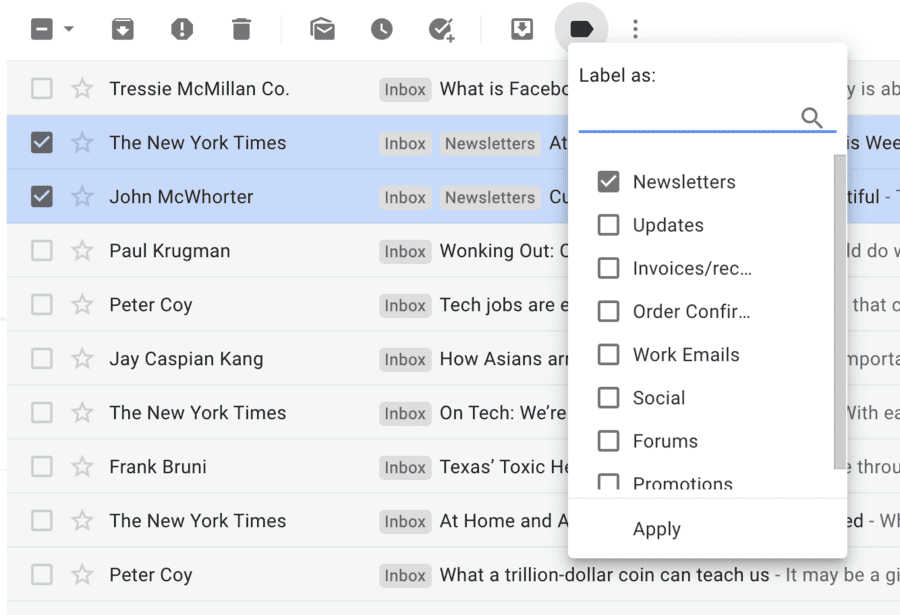
Notice that you can also create and manage your labels by clicking the “Labels” icon in the top menu:
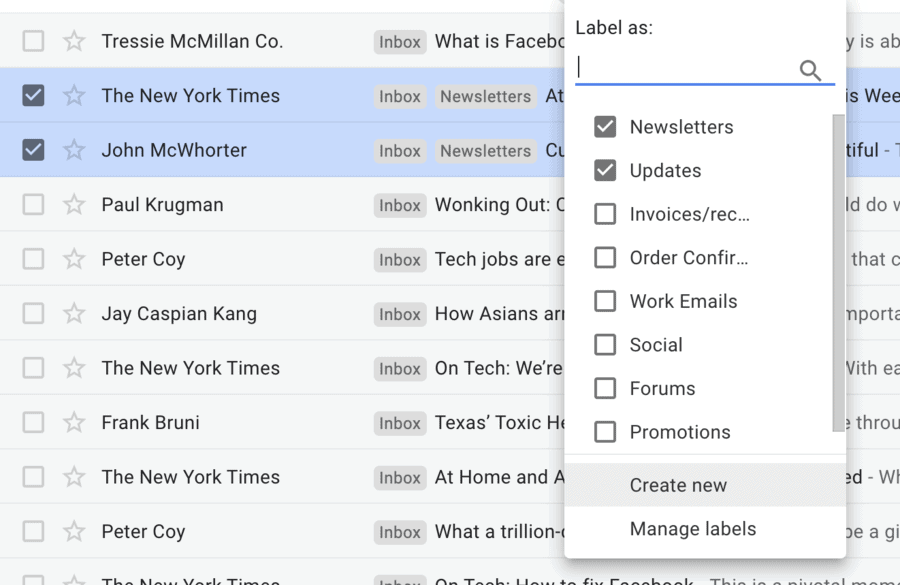
If you want to create a new label for an email on the spot, this is a good way to do it.
How to Add Multiple Emails to a Label
Adding one or two emails to your new Gmail folder is easy enough using the above method.
But, what if you’re trying to completely organize your Gmail account and want to move hundreds of emails into a folder?
Instead of spending the next hour clicking individual messages and applying them to your Gmail folders, use this method:
1. Check the box next to one of the emails you’d like to put into a folder.
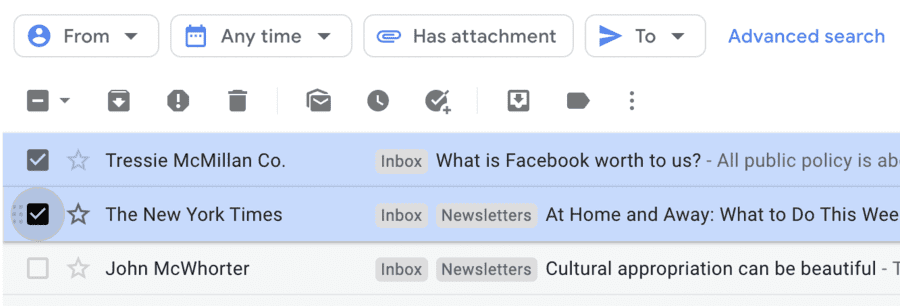
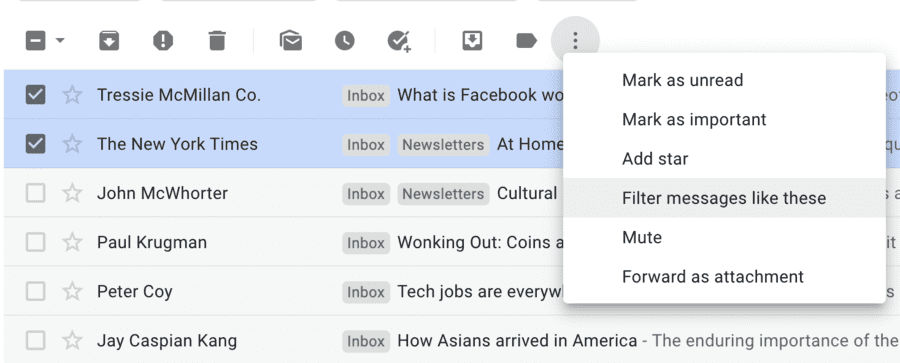
2. After you do that, the top menu will appear. Click the three dots on the right side of the menu, then click “Filter messages like these“.
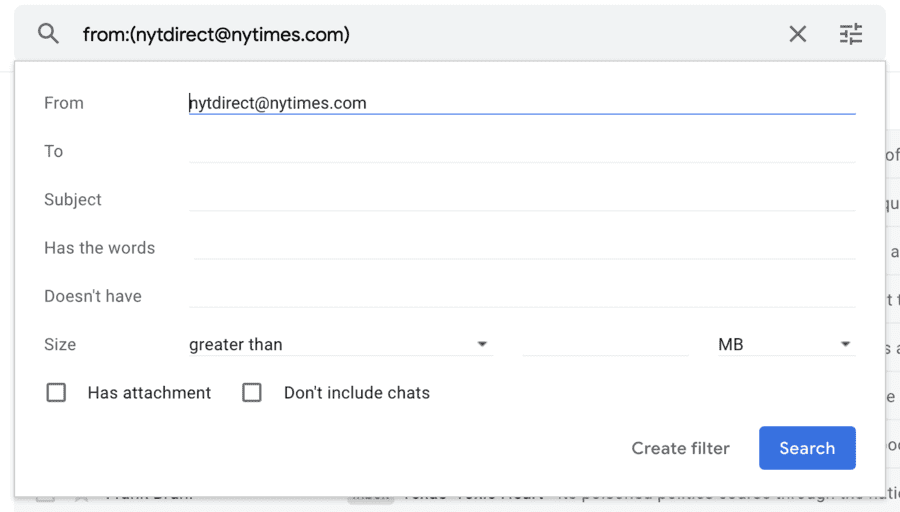
3. Fill out the search parameters to make sure that the search only returns applicable results. If, as in this example, you are only looking for results from one email address, you can simply hit “Search“.
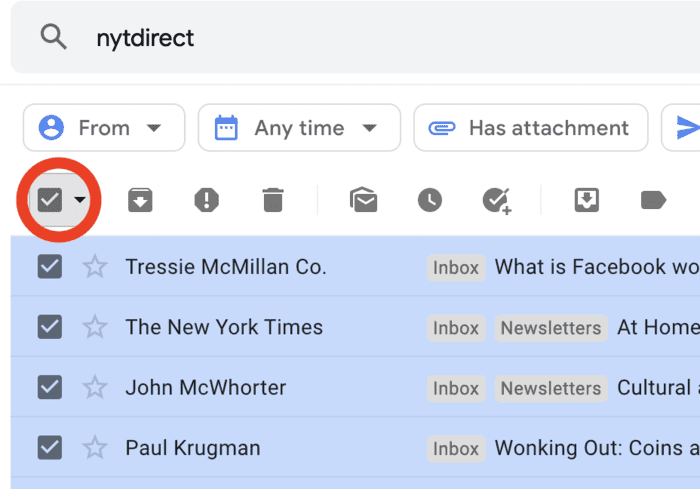
4. Highlight all the emails in the search results by clicking the checkbox in the top left of your screen.
5. Click the “Label” Icon.
6. Then, select the appropriate label (or more than one label if you choose), and click “Apply“.
You may have to repeat this process a few times if you’re trying to create a more complex folder with messages from multiple email addresses, but that’s all there is to it.
How to Automatically Add New Emails to Gmail Labels (Folders)
All of this work would be rather useless if you couldn’t set up your account to automatically sort incoming emails into the right folders. If that were the case, you’d be repeating this process every single time you got a new email.
Luckily, Gmail does allow you to set your emails to automatically sort into the correct filter.
If you want to instantly sort and organize incoming emails, follow these steps:
1. In the search bar, click the “Show Search Options” icon.

2. This will bring up a search filter bar with different parameters, exactly like the one you used to organize your current email inbox into different folders:
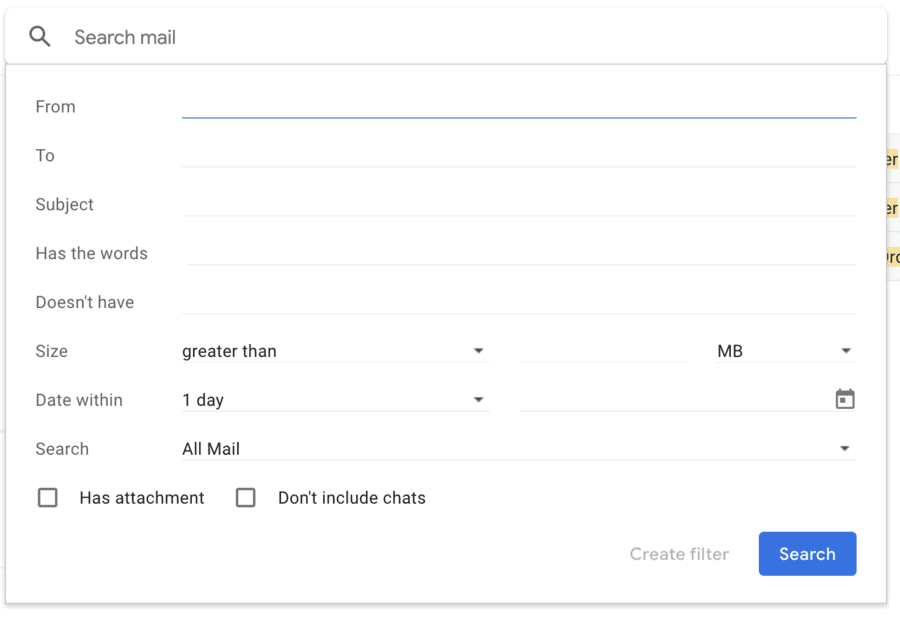
Entering the correct parameters is easy in some cases, but it can also be pretty tricky.
The goal is to enter parameters that will catch every incoming email that would belong in that folder.
You could use an email address or a set of specific words like “order confirmation” that would be included in every email for that particular folder.
You only need to make sure that incoming emails are sorted into the correct folder. Plus, you can edit these settings later if the emails aren’t being filtered the way you want.
So, there is no need to overthink things – just enter some parameters that you think will catch all the relevant emails.
In this example, we’re going to set up a filter to catch all online shopping confirmations.
So, we’ll use the parameter “Has the words” and use the phrases “order confirmation” and “confirmation number”, separated by commas:
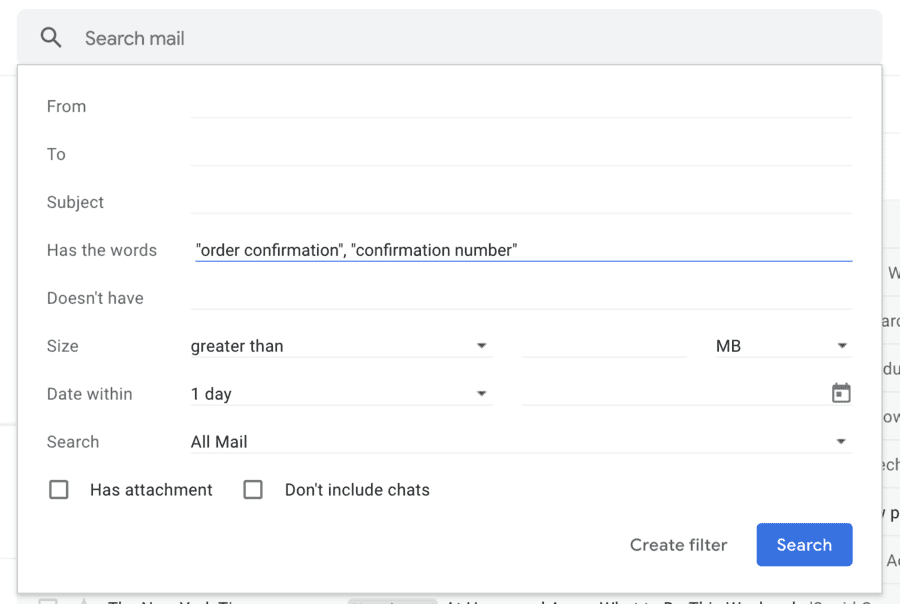
This should catch every online shopping purchase made with this Gmail account – perfect for end-of-month budgeting and tax season.
3. Press “Create Filter“. This screen will appear:
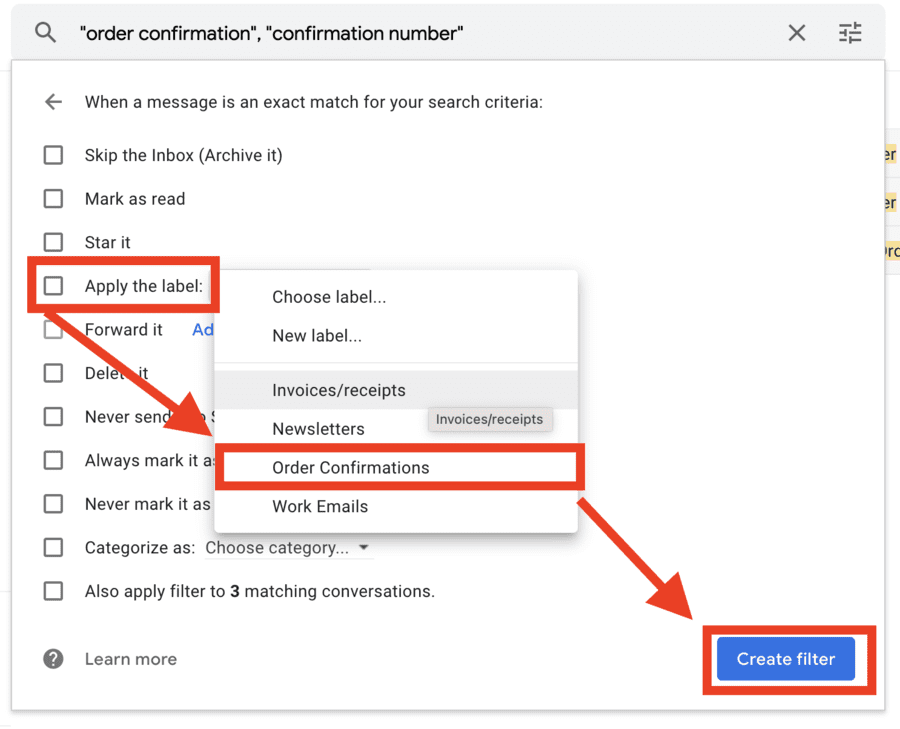
Your work is almost done. Now, all you need to do is find the option “Apply to Label“, choose your desired label, and click “Create Filter“.
From now on, every incoming message that applies to the parameters you entered will automatically be placed into the folder you chose.
The only difficult part about this is getting those search parameters right. The best thing you can do is make them either extremely broad or extremely narrow – depending on the topic of the folder – to make sure Gmail isn’t mis-sorting things.
How to Delete a Gmail Folder (Without Losing Your Emails)
Deleting a folder in Gmail is rather easy – by default, it won’t delete any of your messages, so there’s no risk of losing them.
To delete a Gmail folder, navigate to the side menu, scroll down, and press “Manage Labels“.
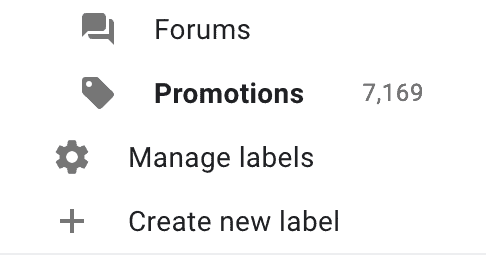
A list of all your labels – both labels that exist by default and labels you’ve created – will pop up:
Find the label you’d like to get rid of, and click “remove“:

Finally, Gmail will ask you to confirm your decision:
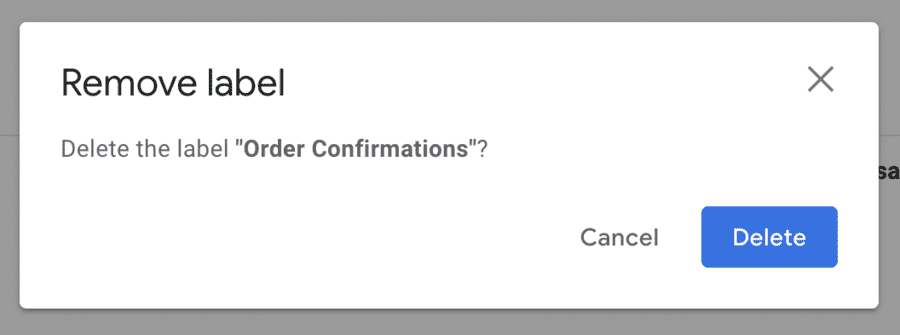
Note: this process is the same on Gmail for desktop and the Gmail mobile app – no need to learn two different ways to do the same thing, at least in this instance.
4 Folder Suggestions for Keeping Your Gmail Account Organized
Email organization comes naturally to some; to others, it’s about as tough as keeping the kitchen tidy. If you’re in that second boat, these Gmail folder suggestions might come in handy:
1. Receipts and Order Confirmations
If you do most of your shopping online – you aren’t alone, e-commerce grows faster than nearly any other industry.
The amount of online shopping you do also means that you are getting order confirmations, shipping updates, and receipts in your inbox. Creating a special filter for them is a great way to keep your primary inbox free from emails you don’t need to open right away.
2. Work Emails
Ever missed out on a customer, a meeting, or even a promotion because an important email got lost in a flood of message in your main inbox?
Creating a separate Gmail label (or several labels nested together) is a great way to make sure those all-important work messages never go un-read.
3. Schedule, Travel and Event Emails
If you go to a lot of movies and concerts or fly for work often, separating your time and date-specific emails into their own folder is a great idea.
When it comes time for your event, you won’t have to dig through your Gmail account to find the right message.
4. Newsletters
Whether it’s your favorite blog, podcast, news source, or business journal, your newsletters aren’t typically urgent. Why not put them in a separate folder so you can get to them… when you get to them?
FAQ: Gmail Folders
Gmail’s default folders, such as “Spam”, “Trash, and “Social” cannot be deleted. You can empty them of messages, but you cannot get rid of the folder itself.
You cannot delete a folder and its contents at the same time. If you want to completely get rid of a Gmail folder, including the messages inside, you’ll have to delete the messages, then navigate to your Label Settings and delete the folder.
In Gmail, “labels” and “folders” are the exact same thing. Creating a label for your email means you are creating a folder – you can use the terms interchangeably in the context of Gmail.
Nested labels are, for lack of a more technical term, “Labels within labels”. They allow you to further organize your Gmail account by creating sub-folders.
Wrapping Up: The Importance of Gmail Organization
The average person’s email account is a mess – thousands of different emails, many of them unimportant, all in one folder.
Gmail tries to help users out by automatically separating some messages into different folders, like “Social” and “Promotions”. But, Gmail users can help themselves far more by creating custom folders (labels) for their messages.
So, if you’ve got way too many emails to deal with, start organizing today and experience a smoother, simpler inbox.
Proper Gmail organization is just as important as knowing when to Bcc, how to add a signature, and how to fix Gmail when you aren’t receiving messages. By the way, we can teach you those things, too.
