
An Excel table allows you to group a range of cells together. If you’re using a table in your Excel workbook, you can sort and filter through your data or apply special formatting to your table to make it stand out.
This makes it easier to scan through and analyze your data, but it can make it difficult to move things around. Table data is locked into the columns and rows in your table grouping, so if you want to manipulate your data (by moving certain cells to another location, for example), you’ll need to remove the table first.
If you want to remove an Excel table, there are a few ways you can do it. You can either remove the formatting to disguise the table, convert the table to become a standard range of cells, or you can delete the table (and any data) completely.
We’ll explain each of these methods for removing a table in Excel below.
Table of Contents
How to remove Excel table formatting
Excel tables allow you to manipulate small sections of data for further analysis. If you want to continue to use these features (such as sorting or filtering your data) but don’t want your table to stand out, you can remove the formatting from your table.
By doing this, your table’s contents will appear like any other cell in your workbook, but you’ll still be free to use the advanced table features.
To remove Excel table formatting, here’s what you’ll need to do:
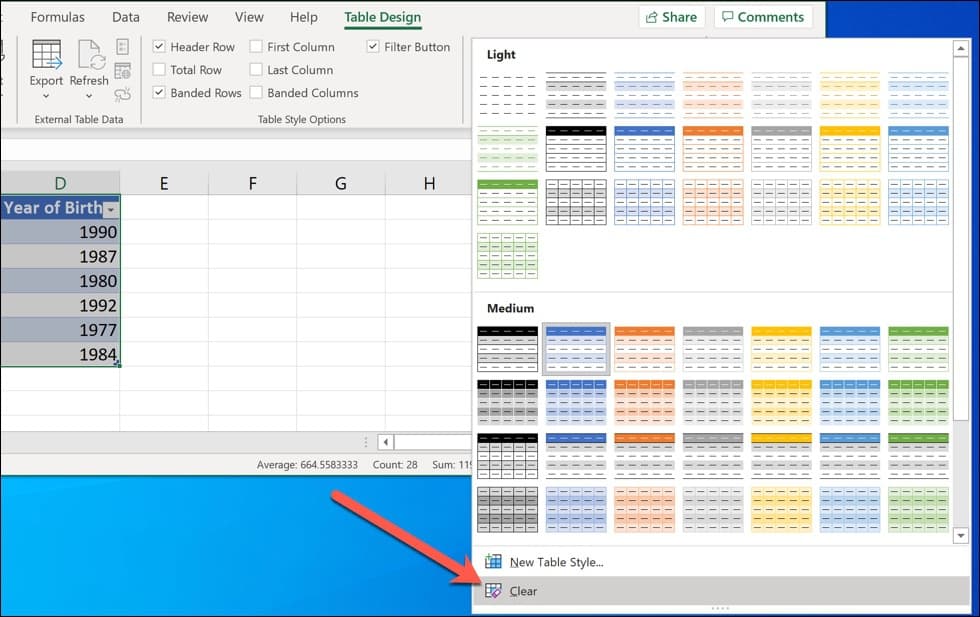
- Open your workbook and select any of the cells in your table.
- Press Table Design on the ribbon bar. In older versions of Excel, press Design, visible under the Table Tools header on the ribbon bar.
- In the Table Styles section, press the More button in the bottom left corner of the carousel. This is the button that is shaped like a downwards arrow.
- In the pop-out menu, press Clear.
At this point, your table will revert to the default Excel formatting. Other than the table header arrows (which allow you to quickly sort/filter your data), your table’s cells will appear like any other cell in your workbook.
How to remove an Excel table without losing data
You can also remove an Excel table by restoring all of the cells within it to a standard Excel range (or group) of cells. This will remove your ability to sort and filter the data separately to other sections of your worksheet. This method allows you to remove the table while keep your data intact, however.
You may want to do this, for example, if you want to rearrange your data. You wouldn’t be able to move columns of data without removing the data from your table first.
If you want to remove an Excel table without losing the data, here’s what you’ll need to do:
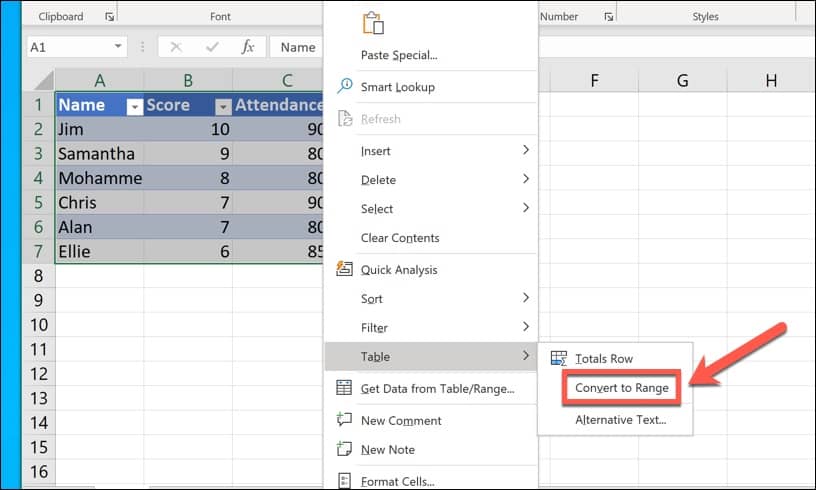
- Right-click any of the cells within your table.
- Press Table > Convert to Range.
- If Excel asks for confirmation, press Yes.
At this point, your Excel table will disappear. You won’t be able to sort or filter the data separately from other cells, but your table’s data should remain in place for you to continue to view and analyze.
How to delete an excel table
If you want to delete an Excel table and erase the table data and formatting from your worksheet, you can do so quickly from the ribbon bar.
To delete an Excel table:
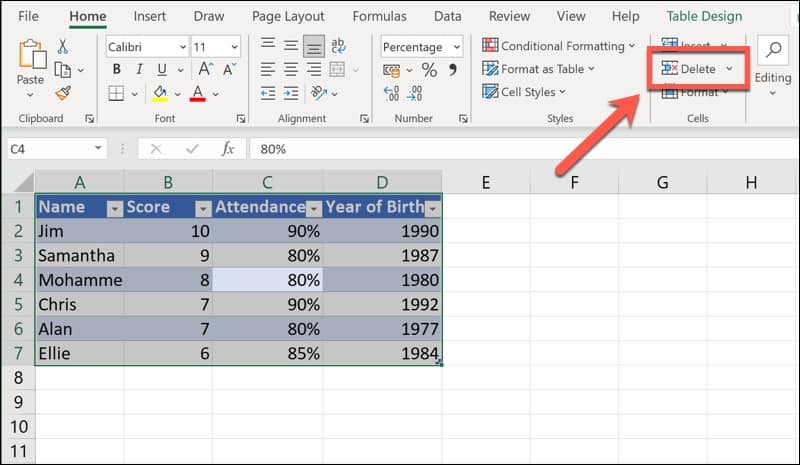
- Open your workbook and select your table. Alternatively, select one of the table’s cells and press Ctrl + A. If the header row isn’t selected at this point, press Ctrl + A again.
- With the table selected, press Home > Delete.
This will remove the table and its data completely. If you need to reverse this, press the Undo button (or Ctrl + Z) immediately afterward.